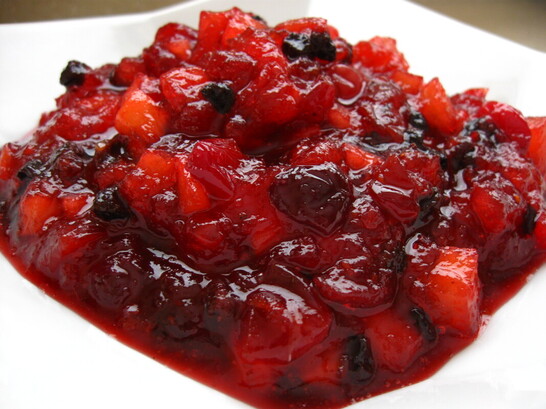
 Are you ready for the big day? We don't live close to family, so Turkey Day is always a fairly laid-back affair with just the three of us. We do, however, really enjoy a good meal, so I just got back from the grocery store and have finally planned my menu. I am the only one in my immediate family that enjoys cranberries, but this is so good, I can't not make it. If you are looking to mix it up a bit this year in the cranberry department, I can't recommend this recipe enough! The apples and spice moderate the somewhat astringent vibe of the cranberries. Currents are totally optional, but I love them in here. They add a lovely pop of color and flavor, and since they are cooked in the sauce, the texture does not stand out in any weird way. If you have a bag of cranberries and some apples and an orange, you can make this sauce in a jiffy, and your guests will be so excited by how deliciously complex this dish is compared to the glop that comes out of the can! 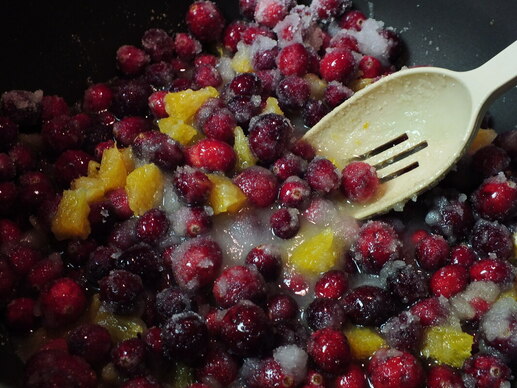 Spiced Cranberry Sauce
Yield: 2-3 cups 1 bag of fresh or frozen cranberries 1 orange, zested, supremed, and juiced 2 apples, peeled, cored, and diced 2 cups granulated sugar 1/4 cup water 1/4 tsp spice mix (mix 1/4 tsp of ginger, nutmeg, cinnamon, and cloves) 1/4 cup currants (optional) 1 TBS brandy (optional) In a saucepan, bring the cranberries, orange juice and zest, sugar, and water to a boil. Reduce heat and simmer until the berries start to pop, about 5-10 minutes. Add the apple, orange sections (cut out so that you do not end up with the membrane - if you're not sure what I mean, look up "how to supreme an orange"), and currents (if using) and cook over medium low heat until the apple is tender. Stir periodically to ensure the mixture does not scorch on the bottom. When the apple is tender, mix together 1/4 teaspoon of the following dried spices: ginger, nutmeg, cinnamon, and cloves. Then use 1/4 teaspoon of that mixture to spice to sauce. You can save the remaining mixture for later or discard it. Let the mixture simmer for five minutes before removing from the heat, cooling, and decanting into a bowl to refrigerate before serving. NOTES: This sauce is quite delicious warm and you could very easily serve it right after removing it from the heat.
0 Comments
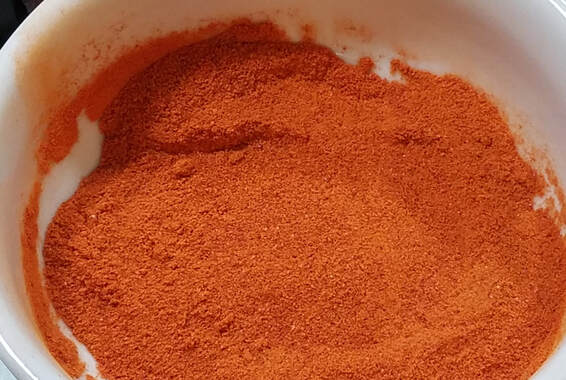 If you are a gardener like me, you spent most of your winter drooling over seed catalogs, ordering seeds, and trying to figure out where the heck you'll put those things you ordered that you had to have but don't currently have a place for! If you have a vegetable garden and have never made your own paprika, this will be a slam dunk idea for you. Even if you don't really garden, this is one of those things that may just change your mind. There are certain things that are just orders of magnitude better when you produce them yourself. Tomatoes, of course, are at the top of that list. Dried herbs like oregano and thyme are on the list, too. I only learned a few years ago that paprika was right up there. 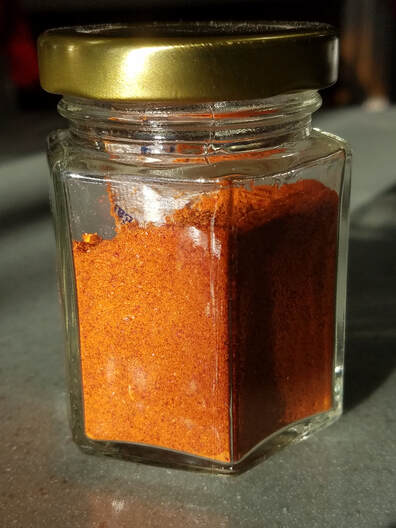 Though there are many ways to finagle this, honestly, I highly recommend three "special" pieces of equipment for this operation. The first is a cold smoke generator. I bought and like the Smoke Daddy smoker. I cut a hole in my Weber grill and it is an amazing way to smoke all kinds of things. It was a little bit of an investment (about $150), but it will last me for a good long time, and now I'm expanding into smoking other foods, too. The second is a countertop dehydrator. I have the Nesco and really recommend getting one with a temperature control setting. The last one is a Nutribullet or similar type blender. You can use a regular blender, but the powder is very fine and can be irritating to breathe. The Nutribullet is completely enclosed. I like that I can pick up and shake it while pulverizing the powder to be sure it isn't clumping on the bottom.  All right, so let's talk about pepper varieties. The best bet is a pepper specifically bred for making paprika. Baker Creek carries a variety that makes a phenomenal paprika! It has a bit of spice, so I usually blend it with a sweeter pepper to be sure it's not too hot. While you can use pretty much any red, sweet pepper, I recommend you try to stick with thin-walled peppers that are good for drying. The thicker walled peppers make a powder that tends to clump. This isn't a huge deal since it breaks apart fairly easily if stored properly, but if you can find some good thin-walled peppers like Criolla de Cocina, you'll have really good results. Harvest the peppers when fully ripe. Only use peppers that are in good condition, without any holes of soft spots. Since the powder will not always be cooked before consumption, the best way to minimize any chance of foodborne illness is to sanitize the peppers before beginning. Rinse the peppers and then dunk in a bleach solution for one minute. You want to be sure to use plain bleach that says it is okay to use for food surfaces (without fragrance, etc.). If it is standard strength bleach, use 4 teaspoons per gallon of water. Also, be sure the water is warmer than the peppers themselves to minimize any potential for any of the wash water being sucked into the pores of the fruit. Rinse the fruit one more time with clean water and you are good to proceed.  Cut the peppers and remove the stems, seeds, and white pith. Place the peppers on racks. This photo shows them cut side up. I have since started turning them cut side down because I noticed the peppers often accumulate moisture in them that way, and we want to minimize that. Cold smoke the peppers heavily for three hours (by cold smoke, I mean no heat added, not that the peppers are "cold" or anything). I experimented with a few different kinds of wood for the smoke and found cherry was, by far, the best. 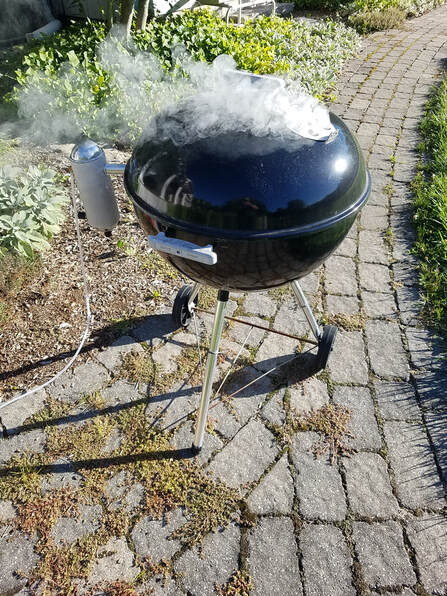 The next stop is to dry them thoroughly in a dehydrator. If your dehydrator has a temperature control, set it to 145F. While drying, the peppers will release A LOT of smokey aroma. I dry mine outside under a covered porch. It usually takes 12-16 hours to dry them completely in an average humidity location. You want them to be absolutely, completely dry, crisp and crunchy all the way through. There is no such thing as over-drying them, so if you are unsure whether they are done enough, wait a bit longer. 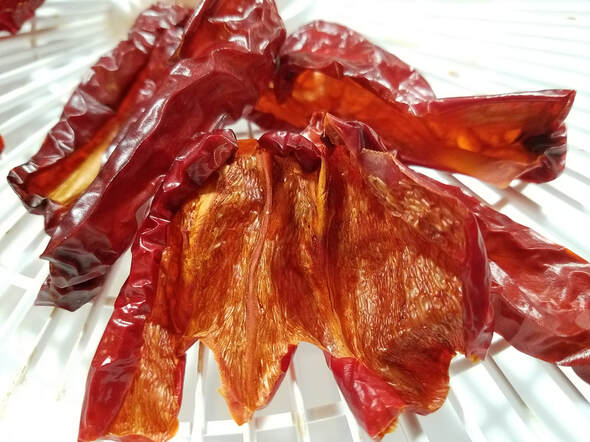 The last step is to run them through a blender of some kind. Again, I highly recommend a Nutribullet type contraption. Then, sift the powder through a fine sieve to remove any larger pieces that didn't break down. I store my powder in jars with plastisol type seals (jelly jars or the like) with a food grade moisture absorber (available on amazon for a very reasonable price). If completely powdery and dry when complete, it keeps very well for over a year. 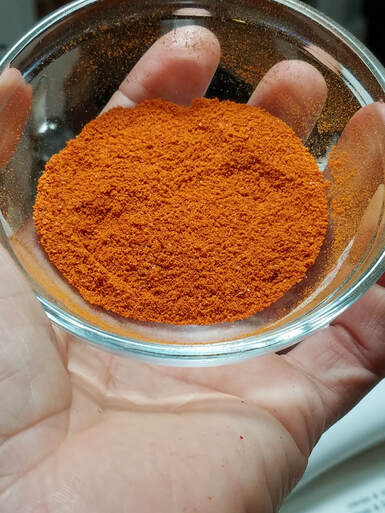 My mom had been in Europe and bought some Hungarian smoked paprika about the time I started experimenting with this. After she tried mine, she made it clear that she thinks mine is way better! How's that for a recommendation!?! I have found so, so many uses for this stuff. Now that I make my own, I find I use smoked paprika way more often than I used to. It's just so darn good! I wish the state would let me make it to sell, but they won't without a commercial kitchen, so I figured I'd just have to tell you how to make your own! Trust me, it's so worth it!
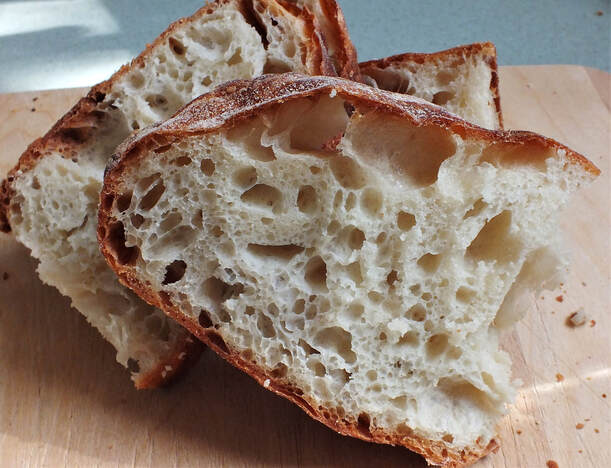 It took me a long time to figure out how to make bread with big holes. The key is to have a very wet/hydrated dough. That part is easy. Mix more water in? Ok. No problem. But then what!?! How do you knead such a thing and how do you shape it? The good news is that this bread does not require any kneading and the shaping is actually quite easy, provided you know the secret. I make all kinds of breads, some easy and some very involved (can you say croissant?). This may be one of the easier breads in my arsenal. I love the simplicity of it... just four ingredients. And since it ferments overnight on your counter, it has a nicely complex flavor. Really, it's just a win-win. The night before you want to bake the bread, mix the flour and water in a bowl or tub of some kind. It should be at least two quarts in volume. Let the flour and water sit for 15-20 minutes and then add the salt and yeast. Use damp hands or a mixer to thoroughly mix in the salt and yeast. If using your hands, a pinching motion is very effective. Cover the dough and let sit on the counter overnight. The next day, when ready to finish your bread, flour your board/counter and using a wet hand, dump the dough onto the counter. Pull and fold the dough until it tightens up and starts to form a nice ball and then pinch the seams together. Let the dough proof on the counter with a towel or wrap over it. It's okay if the outside of the bread dries out a little bit. When the dough looks like it is just about ready, preheat your oven to 450F with a Dutch oven in it. You could also bake this bread on a pizza stone and spritz water in a few times during the first few minutes of baking, but the Dutch oven seems easiest. So how do you know when the dough is done rising after shaping? Give the dough a little poke and see how quicky it springs backs, if at all. Depress the dough about half an inch. The video below shows dough that still has a bit to go. Notice how quickly the hole rebounds. If I had let the video go a bit longer, you'd see that within a minute the hole is almost completely rebounded. There's a fine line between a loaf that is ready and one that is too far gone, so err on the side of caution. When the hole is slow to rebound, you should go ahead and start preheating the oven. Gently dump the loaf into the Dutch oven, seam side up. This will allow the loaf to usually break open on top, like you would get with a cut score line, but you don't have to score it. You may be worried about the loaf getting misshapen, but I have found, the loaves are usually pretty forgiving. Just be careful not to burn yourself on the hot pot! Let the loaf bake with the lid on for 25 minutes and then remove the lid and carefully remove the loaf from the pot and finish baking on the rack. Be sure to let it bake fully, getting nicely darkened, to ensure the crumb is not gummy when it cools. Speaking of cooling, be sure to let it do so completely (or almost completely) before cutting. I know it is soooooo hard to leave it be to cool, but it is an important part of the baking process! Easy Holey Boule Yield: 1 medium sized boule 500 grams white bread flour 390 grams warmish water 7 grams salt 1/4 tsp instant yeast The night before you want to have the bread, mix the flour and water and let it sit for about 20 minutes. Then add in the salt and yeast. Cover and let sit on the counter overnight. The next day, the dough should have doubled or tripled in size. Sprinkle some flour on the board/counter and wet your hand. Shape the dough into a boule using folds (see video in this post for how to do that). Place in a well floured proofing basket seam side down. Cover and let proof fully (see comment with video above for details). When dough is almost fully proofed, preheat the oven and Dutch oven to 450F. Gently dump the loaf into the Dutch oven, seam side up. Bake, covered, for 20 minutes. Carefully remove the loaf from the Dutch oven and finish baking on the rack. Let the loaf bake until very golden brown. Let cool fully before slicing. I think the easiest way to cut a boule is to cut the loaf in half, place a half cut-side down, and then cut into slices. 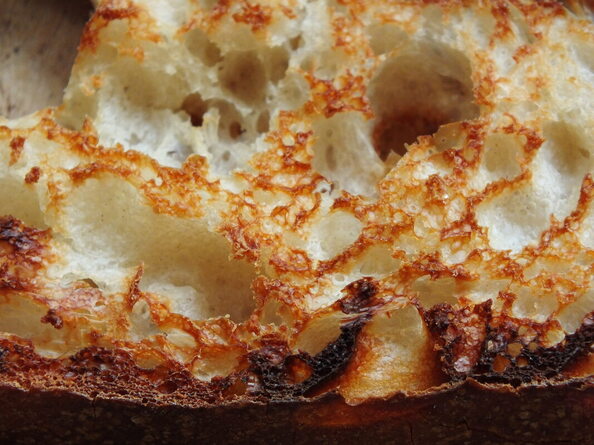 By the way, we call toast made from this kind of bread "crunchy toast" in our house to differentiate it from regular loaf bread toast. It truly is a spectacular way to enjoy it. The crispness of it is out of this world! So delicious!
 I love this recipe, but I have to begin with a bit of a caveat. I may love broccoli more than any person on the planet. Whatever that gene is that makes you not like broccoli? I sure don't have it. I adore this vegetable. Not only does it taste great to me - even just simply steamed - but it is so good for you! Some people grab a yogurt when they feel like their gut is feeling wonky; my go to is broccoli. I aways feel so good after I've eaten it. Last year, I planted "aspabroc" or "broccolini" in my garden. What an amazing and surprising harvest that was! I planted eight of them in early May and started harvesting, I think, in late June. I harvested regularly all the way through early October. You don't ever get that with regular heading broccoli! And it tasted amazing. I have my seedlings started for this year, but in the meantime, I have to settle for the store-bought stuff.  One other gardening mention here... two years ago, I planted garlic for the first time. I bought two varieties. One was a really common variety that everyone talked about liking. It is called Music and it is a fine variety. The other variety, I bought only a small amount of because there weren't a lot of folks talking about it online, but I liked the description of it. I. Love. That. Garlic. This past fall, this special variety was all I planted. It is called Georgian Crystal. I tried it because the description said it was mild when raw (I want to enjoy lots of garlic flavor when raw, not a hot spiciness that some varieties have) and is also great when roasted. That description fits this garlic to a T... and it makes big cloves to boot! It is amazing - the perfect multi-purpose garlic. I was surprised at how easy garlic is to grow. I highly recommend growing your own if you are garden inclined. 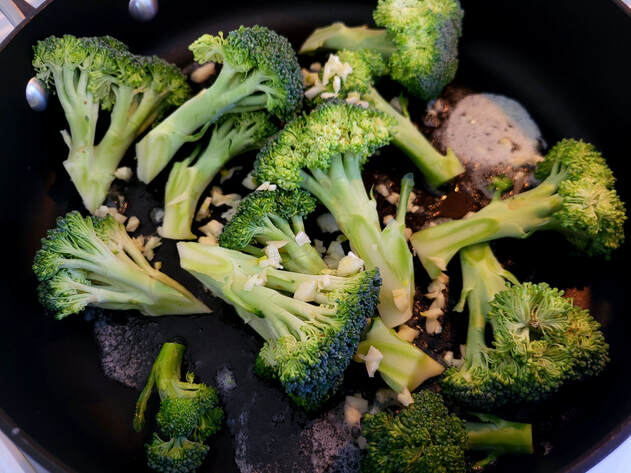 This is a super easy way to enjoy broccoli. The garlic adds a nice, toasty umami flavor to it. You can chop the pieces any size that you like - obviously, the smaller the pieces, the faster it will cook. Pre-heat a non-stick pan with a pat of butter. Then toss in the broccoli and the garlic. Put a lid on and put the heat on medium. Shake the pan from time to time to stir the broccoli. If you notice it browning too much too fast, simply turn the heat down.  Use a fork periodically to check how tender the broccoli is. When it is close to being done, you can turn the heat up to get some nice browning as it finishes up. Don't forget to salt before serving. This is a great side dish for a quick weeknight meal as it takes very little effort to prepare. The broccoli cooks in less than ten minutes.
Blistered Broccoli with Garlic Yield: variable broccoli or broccolini, split into manageable spears 1 large clove of garlic, minced, per half pound of broccoli 2 tsp butter salt to taste Pre-heat a non-stick pan while you prepare the broccoli and garlic. Add the butter and swirl it around as it melts. Add the broccoli and garlic and cover with a lid. Cook over medium heat, shaking the pan or stirring occasionally to brown evenly. Reduce heat if broccoli is browning too quickly. The broccoli takes less than ten minutes to cook if you like it with a bit of a bite to it. When broccoli is nearly as tender as you would like, you can remove the lid and turn the heat up to put a last bit of browning on it. Salt to taste and serve. 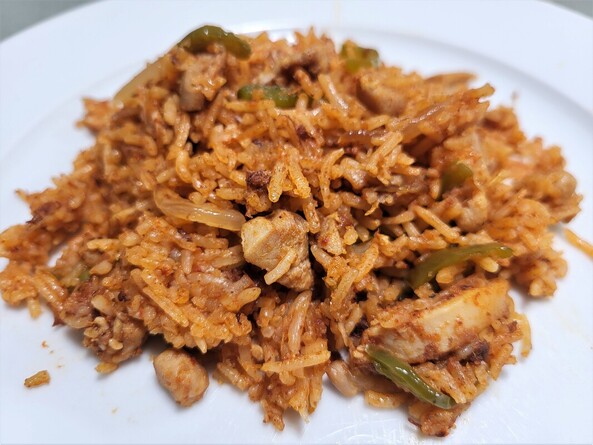 One of the great things about being a military family is that you get to live all over. Though we were never stationed abroad, we lived in seven different places during the fifteen years between when I met my husband and when he retired. One of our favorites was the Washington DC area because of the plethora of choices in international cuisine. When we move to middle Georgia, we were a bit saddened because the level of choice declined precipitously, so imagine our surprise when we came across The Metropolis Grill. This little place covers a huge portion of the world in its cuisine, ranging from Greek to Indian, but they do it all well. It was there that I finally had a tzatziki that I like (it is usually too tart for me - now I use sour cream instead of yogurt to make it and it is AMAZING!). It was also there that I was introduced to biryani. There are many, many varieties of biryani out there. This one is pretty basic, but oh so delicious... and quite easy to make! It can easily fit into a weeknight rotation. There is a bit of chopping and a little bit of grating involved and then you walk away for 20 minutes. Then, poof! Dinner is ready. First, you need to prep the veggies. This is a dish that is a bit of a blank canvas. Feel free to add additional veggies and spice as suits your family. Some of us here have a bit of a sensitivity to hot spicy, so this is pretty mild as it is written.  You definitely want to use chicken thighs in this recipe. Since the chicken cooks while browning first and then also cooks with the rice, you don't want to use chicken breast because it would dry out so badly. The fattiness of the thighs is perfect for this dish. Slice them into fairly small bits so they distribute evenly in the rice when done. I suggest 1-2 pounds of chicken in this dish; use your judgement depending on how "meaty" you want the final product to be. 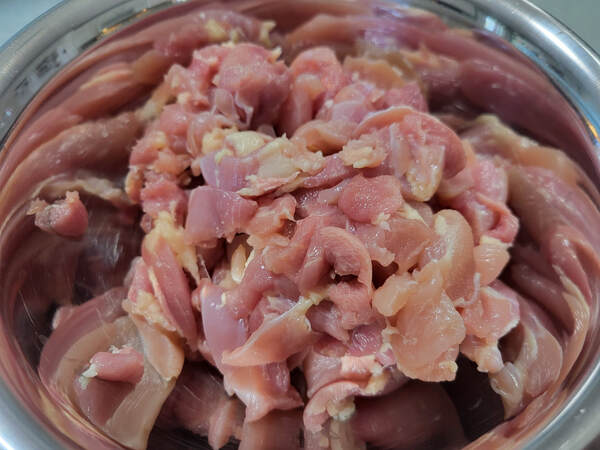 After you soften and brown the vegetable and meat, you mix together the flavor base, which includes a fair amount of ground ginger. I keep pieces of peeled ginger in the freezer so that it is always ready to go when I need it. When I tried to keep it on hand fresh all the time, it was always going bad. This way, I never waste any and grating it with a Microplane results in the perfect ginger paste. Measuring the amount can be a bit tedious, so I always just kind of eyeball it. It doesn't have to be exact! 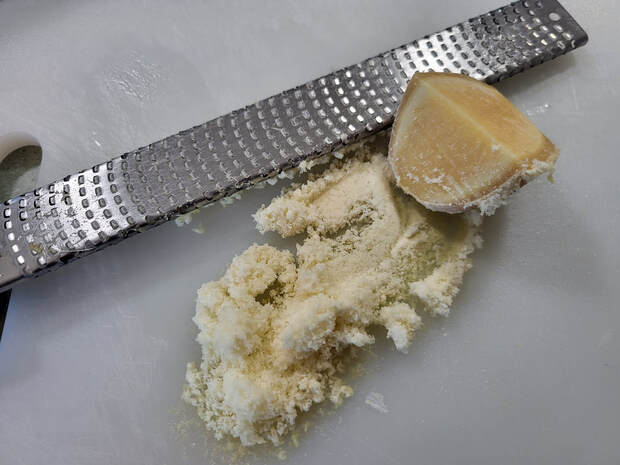 Once you have the sauce mixed, bring it to a boil and dump in the basmati rice and then spread the veggies and meat on top. Put the lid on, turn it on low, and walk away for 20 minutes. 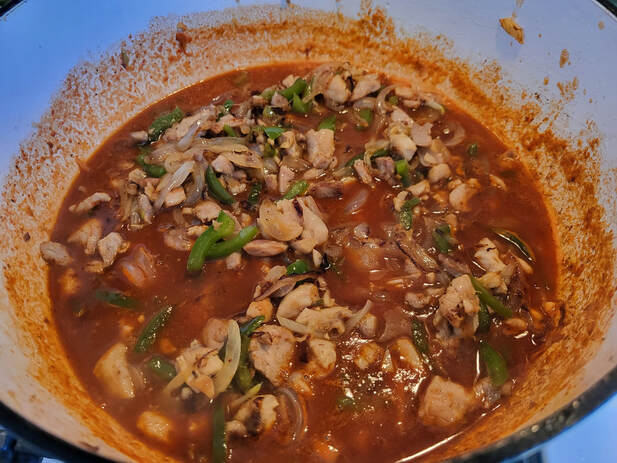 You will be amazed at the fluffy, delicious dish that awaits you when you return. It is also excellent as leftovers, so feel free to double the recipe if you wish. I forgot to the time I made this for the photos, but I also like to add chopped fresh or frozen parsley at the last minute before serving. Biryani
Yield: 4 large servings 1 large onion, cut in small slices 1/2 - 1 green bell pepper, cut in small slices 1 large clove garlic, minced or grated 2 TBS ghee (clarified butter) 1-2 lb boneless, skinless chicken thighs, sliced small 2 1/2 cup water 3 TBS tomato paste 1 TBS fresh ginger, grated into a paste 1 TBS smoked paprika 1 tsp garam masala 1/2 ground cumin 1/2 tsp salt, plus to taste 1 1/2 cup basmati rice, rinsed Heat a large Dutch oven with the ghee and sauté the vegetables until soft and browned. A bit of browning is important for the overall flavor development of the final dish, so don't be shy here. Remove the veggies into a bowl temporarily while you then brown the meat. Again, try to develop some good color. The nice thing about thighs is that you can forego the "small batches" method of sauteing and let them steam cook initially; eventually, the liquid will all evaporate and then you can easily get some nice color on them without worrying about the meat drying out or getting really tough. Remove the cooked meat to the bowl as well briefly. Add the water to the hot pan and use it to loosen up any browned bits on the bottom of the pan, if necessary. Add the tomato and seasonings and let the mixture come to a boil. Add the rice, stir once, put the mixed veggies and meat on top, and put on the cover. Reduce the heat to low and simmer for twenty minutes. After twenty minutes, remove from the heat and let sit for just a few minutes before opening the Dutch oven and fluffy it all together. Serve and enjoy!  I love baking homemade bread. Waiting for it to cool enough to cut when it is fresh from the oven is the hardest part, and yet, with many of my favorite recipes, toasting them on subsequent days is my number one way to enjoy them. This one especially fits under that category. This bread is full of heavy, hearty add-ins, and that means that it ends up being a fair dense loaf. When toasted, that denseness is completely irrelevant and with a little butter - maybe some jam - this bread is a meal unto itself. You can mix your own add-ins, but I use Bob's Red Mill Muesli as my main player along with some dehydrated apples that I cut up with scissors. I especially love the dried fruit. It gives a great little flavor burst in the finished bread. 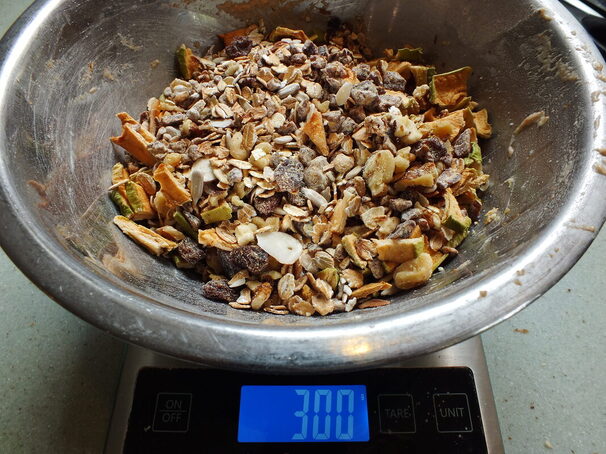 Bread making is about the only time I use weight measurements. It just makes it so easy to measure out the ingredients. This bread is mixed in two stages. It has a pre-ferment, but it is a fairly short-lived one, only about two hours. The preferment has a fair amount of food for the yeast in it, so it gets big fast. 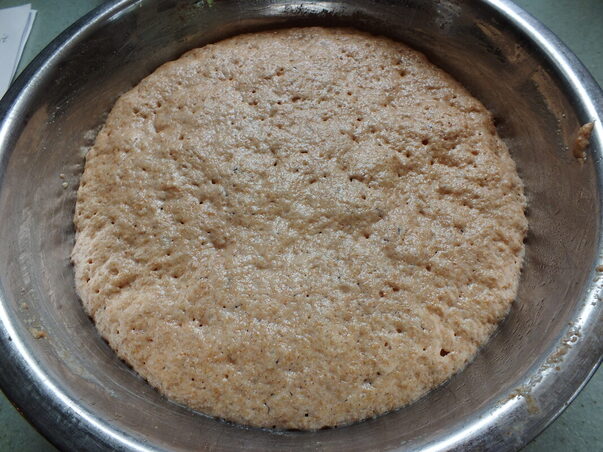 To the preferment, you add the water, flours, and salt and then mix either by hand or with a stand mixer. Do NOT add the add-ins until the bread is well kneaded because they will break the developing gluten strands and make it hard to develop the dough. Once the dough is stretchy and smooth, about ten minutes of mixing, you can very gently mix in the add-ins. You do not want to overmix the dough at this point, just mix enough to get them somewhat evenly distributed. Cover and let rise in a warm place until double, normally a few hours. 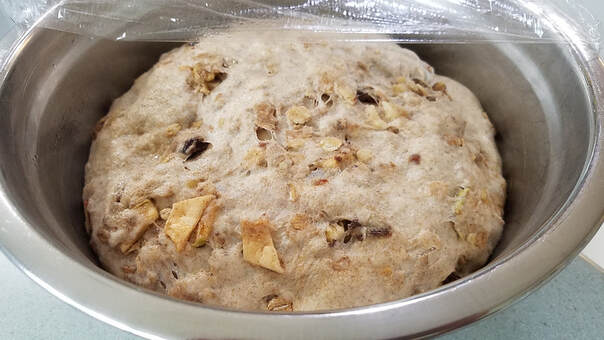 This dough is fairly easy to shape. Dump it out on the counter and shape into a stubby rectangle, then pick up the ends and alternatively flip the ends to stretch the dough. You want the motion of a suspension bridge while gently pulling apart the dough. This will cause it to thin and elongate. Shape into a roughly 12 x 4 inch loaf. It will be about 3/4 of an inch thick. Cover with plastic wrap and let rise until almost double. 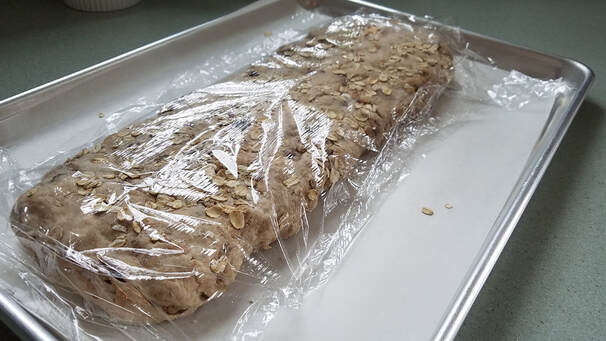 When the dough is getting close to being ready, pre-heat the oven. The dough will be puffy and it is ready when you gently poke the dough with your finger and it is slow to rebound. To help with crust development, I also have a spray bottle with water in it and give a few spritzes on the sides of the oven when I put the loaf in. 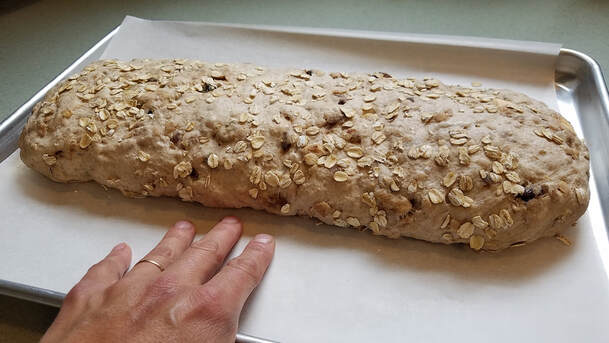 Bake for 25 to 30 minutes, until the bread has a nice golden color on it. On this loaf, color is normally enough of an indicator to tell when it is done, but other signs include a hollow sound when tapped and an internal temperature of 210F. 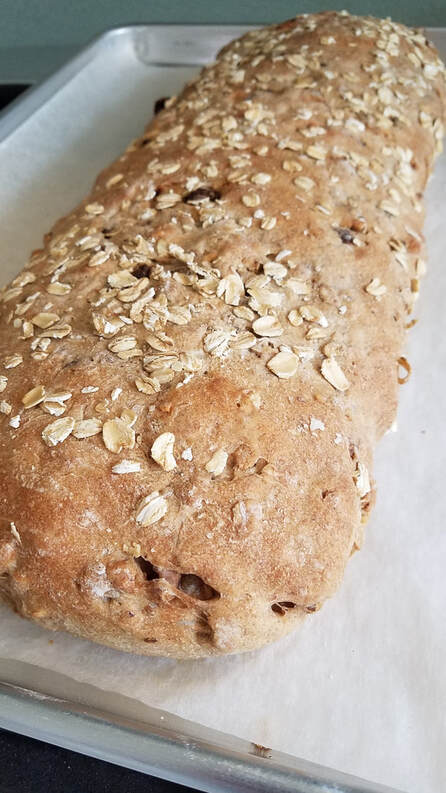 Again, the hardest part is to let it cool for a bit before slicing into it. That cool down time is actually a very important step in the baking of a loaf, so try to curb your enthusiasm! Look at all that good stuff in there. Talk about a bread that tastes good and keeps you going. 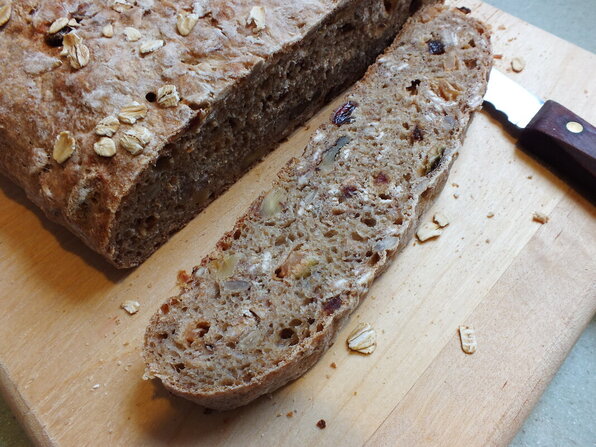 Muesli Bread
Yield: 1 loaf Preferment: 200 g whole wheat flour 200 g lukewarm water 30 g honey 5 g instant yeast 200 g water 250 g bread flour 50 g rye flour (light or dark) 10 g salt 300 g mix ins (such as muesli mix, rolled grains, nuts, seeds, and dried fruit) Mix the preferment and let sit 2 hours until puffed and bubbly. Mix the preferment and all other ingredients except the add-ins and knead until stretchy and smooth, about 10 minutes. Once the dough is nicely developed, gently knead the add-ins into the dough. Do not overmix at this point because the add-ins can break down the gluten structure you worked so hard to develop. Let the dough rise in a covered bowl until double. Shape the dough into a roughly 12x4 inch loaf. It should be about 3/4" tall. Place on a parchment covered or greased sheet pan and cover with plastic wrap or a damp towel to rise until almost doubled. It will be nice and puffy when ready. Shortly before it is ready, preheat the oven to 450F. When the loaf and the oven are ready, place the uncovered loaf in the middle of the oven, spritz the sides of the oven a few times with water from a spray bottle and then reduce the oven temperature to 400F. Bake for 25-30 minutes, until the loaf is nicely golden. Let cool almost completely before enjoying. This bread makes excellent toast, and I like to slice the bread and then freeze the slices so I can easily grab a slice and toast it on busy mornings for breakfast. 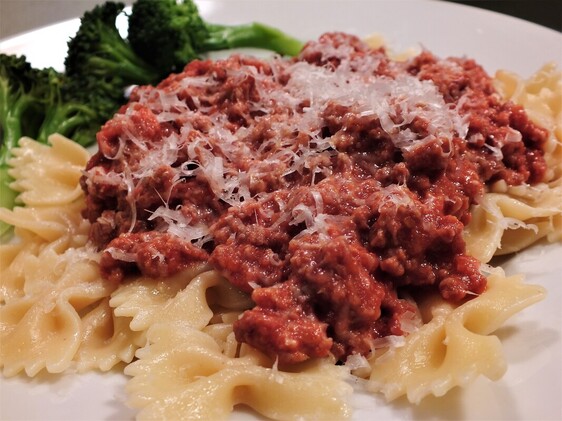 I'd always been under the impression that Bolognese was a commitment to make, that it was hard and time consuming. Turns out, it really just takes time to cook, but the actual work involved is relatively minor. A little upfront work with a knife and the rest is cake. Bolognese is one of those dishes that I think tends to have a bit of confusion around it. Just what is it, anyway? I've heard it used as a synonym for the classic American red spaghetti sauce, but that's not what it refers to in Italy. This is a fairly classic (and easy) version of the Italian Bolognese sauce, which involves a soffritto, meat, milk, wine, and tomatoes. A soffritto (not to be confused with the Spanish sofrito) is simply a flavor base of minced onion, celery, and carrot, cooked in olive oil. I add a little garlic here, too, because, well... garlic. Yum. 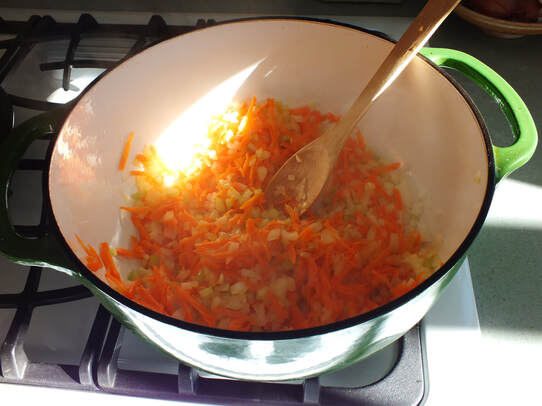 In this case, I actually like to grate the carrots so that they completely break down into the dish. I like the final texture better and the carrots simply become a part of the flavor base. After the soffritto is softened and golden, add the meats and brown. Once it is cooked through, you can deglaze the pan with the wine (be sure to use a decent wine). Add the broth and salt. Bake in a 350F oven with the lid ajar for about one hour. The liquid will be almost all gone and the pan will have a bunch of good stuff cooked up onto the sides. That's some good flavor there!! 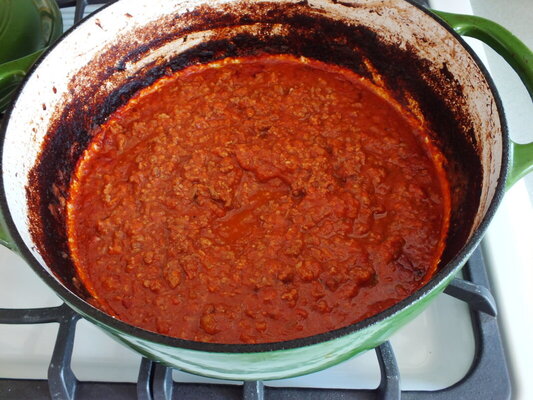 Remove from the oven and add the milk (be sure to use whole milk for the best results), tomatoes, and nutmeg. Stir together and then put back in the oven for another hour with no lid, stirring periodically. When it is almost as thick as you would like it, reduce oven to 300F and add the bay, a dash of ground white pepper, and salt to taste. Continue baking until it is the thickness you prefer. I like mine pretty thick because it concentrates the flavors so much. If it gets too thick, you can always add a bit of the pasta water to loosed it back up. Serve over pasta with fresh Parmigianino Reggiano. Classic Bolognese Serves: 4 2 TBS olive oil 1 medium onion, minced (1 1/2 to 2 cups) 1 medium carrot, shredded (about 1 cup) 2 stalks celery, minced (about 1/2 cup) 1 large garlic clove 1/2 tsp salt 1 pound ground pork 1 pound ground beef 3/4 cup Chardonnay 1 cup beef broth 1 1/2 cup whole milk 1 (26oz) box Pomi strained tomatoes (see note below) 1/8 tsp ground bay dash nutmeg and white pepper salt to taste Sauté the vegetables in the oil in a heavy Dutch oven. Preheat the oven to 350F. When vegetables are softened and slightly golden, add the meat and brown through. Deglaze the pan with the wine, add the broth, and bake with the lid ajar for one hour. The liquid should be almost all gone. Remove from the oven, remove the lid, and add the milk and tomatoes. Stir until well mixed, scraping down the browned bits from the sides. Continue baking, uncovered, for another hour or so. Reduce the heat to 300F, add the remaining seasonings, and then return to the oven for 20 minutes or until the sauce is thick enough for your taste. Serve over freshly cooked pasta. If the sauce ends up too thick, you can stir in some of the pasta water to loosen it back up. NOTE: You can use any tomato puree you'd like, but I have become convinced that Pomi tomatoes are the best out there. They are always sweet, they don't have the acrid tang that sometimes plagues tomatoes in a can, and I never regret adding them to a dish. You can find them in most supermarkets. Look for the red and white cartons.  I got hungry this morning and those ripe bananas sitting in the fruit bowl were talking to me. Well, actually, they were talking to my nose, but the end result is the same. I've been making a "rustic" banana muffin for years, but it had quite a bit more sugar and fat than I thought was really necessary. It was tasty, but I thought I could tone it down and still end up with a fine muffin. 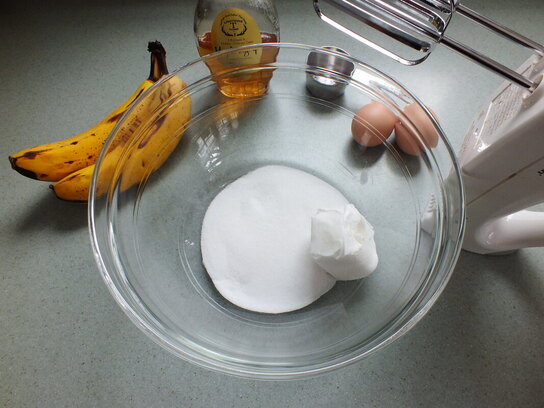 I went back and forth over whether to switch to simply using oil compared to shortening. I love the ease of oil over having to cream a batter. I made the switch on a different muffin recipe I use with great success, but I thought I might need that creaming to keep the texture I wanted. I think you could probably use oil instead of shortening and the result would be pretty good, so run with it if you need to. You also have the option to use maple syrup or honey as the liquid sugar in this muffin, depending on the flavor you're going for. I love them both, but they are slightly different. Try them both and see what you think!  Briefly cream the fat and sugar together and then beat in the eggs. I'm so happy to have farm fresh eggs again. In hindsight, I had pretty good timing on that choice to raising hens last year! 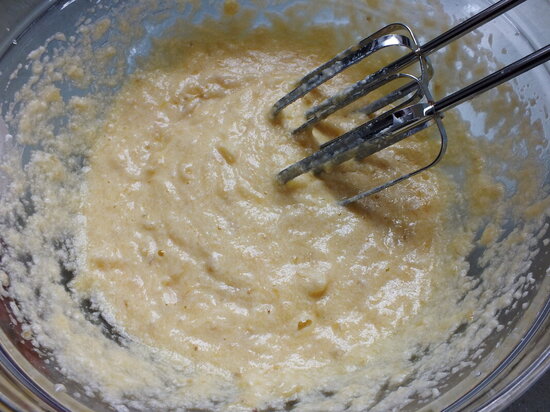 Mash the bananas and then beat them into the wet ingredients. You need a cup of banana puree, which is usually two large bananas, but if you end up a bit shy, just top off with water to make the cup. 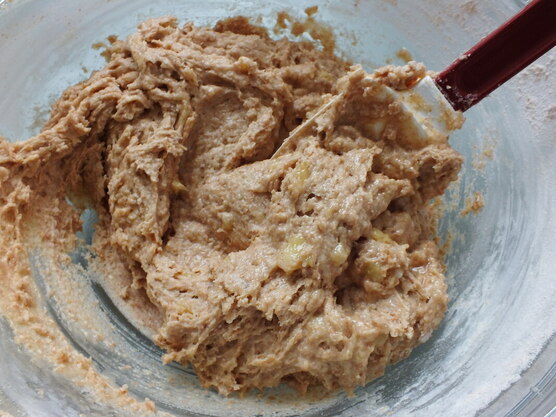 The batter will be fairly stiff and that's all right! 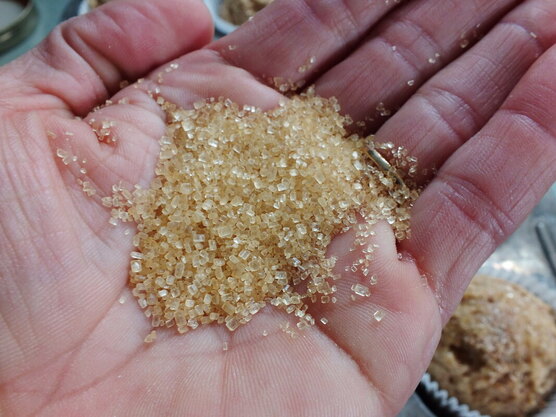 Sprinkling the tops with a bit of wheat bran and turbinado sugar really makes them special. Turbinado sugar is a coarse crystal, less refined sugar. It has a bit of a molasses edge and the crunch it gives to the top of the muffin is a totally not optional option in my mind. 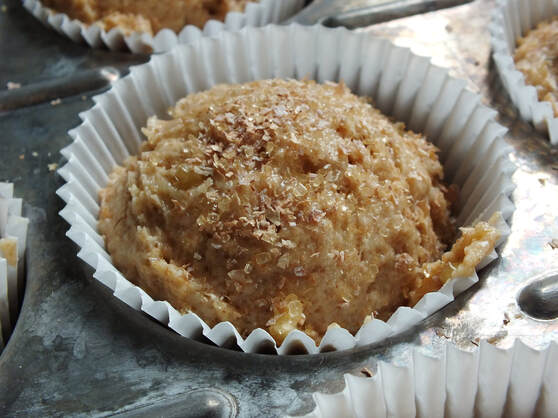 I use a size 16 disher to make loading the muffin cups easy (that's the blue handled one, if your dishers are color coded). Sprinkle the tops and bake in a preheated 375F oven for about twenty minutes. When the tops start to brown and the muffins are no longer jiggly, they should be ready. 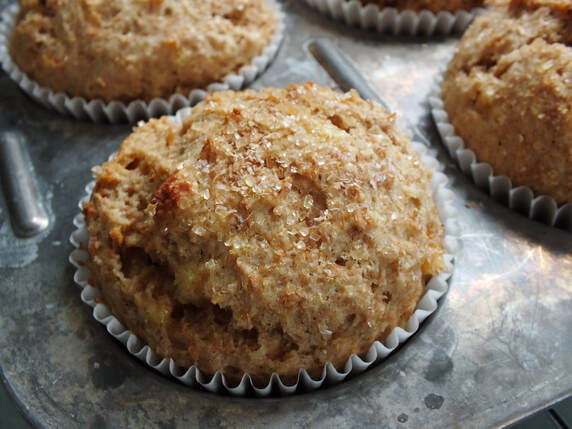 Look how much they rose in the oven! These muffins have a pretty tight crumb structure, but they are soft and delicious. Let cool slightly before eating so that the paper will come off easily. Hearty Banana Muffins Yield: 12 muffins 1/3 c vegetable shortening 1/3 c maple syrup or honey 1/4 c sugar 2 large eggs 1 c mashed bananas 1 c all-purpose flour 1 c whole wheat flour 1 TBS baking powder 1/4 tsp salt 1/4 c wheat bran 1/2 c chopped walnuts (optional) sprinkle of turbinado sugar and wheat bran for the tops Preheat the oven to 375F. Briefly cream the shortening and sugar together. Add the eggs and beat. Mash the bananas and then add to the creamed mixture. If you're bananas don't quite make the amount required, simply top off with a bit of water to make the cup and a half. Beat until well mixed. In a separate bowl, mix the remaining ingredients. Add the dry ingredients to the wet and stir gently until well incorporated. Use a #16 (blue) disher to fill muffin cups about 3/4 full. Sprinkle muffins tops with a little wheat bran and then turbinado sugar. Bake until beginning to brown on the tops and a tester comes out clean, about 18-20 minutes. Let cool slightly before serving. Muffins freeze very well. Use a microwave to thaw if frozen: 25 seconds for one and 40 seconds for two in most microwaves.   'Tis the season! Asparagus will always hold a special place in my heart as far as vegetables go. I love that it is usually one of - if not the first - home grown, fresh produce I get to enjoy from my yard every year. The excitement I experience when I notice the first sign of them punching through is indescribable! 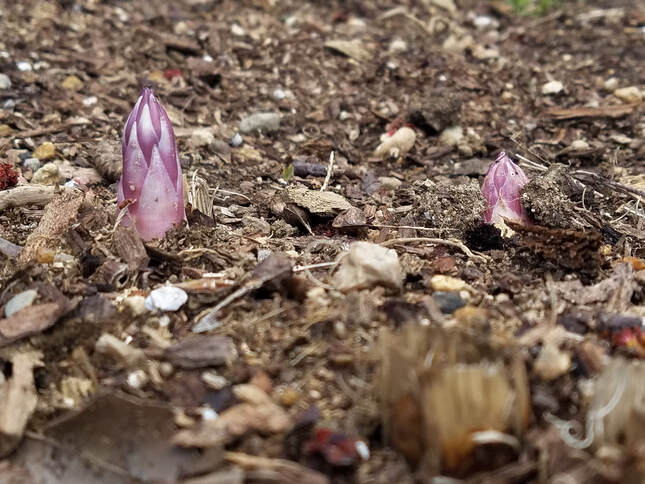 Of course, you have to still wait a bit between seeing them first pop through and having your first harvest... and that waiting can be hard! My first harvest, which is usually less than a pound, is always roasted because that's my favorite way to enjoy asparagus, but, as the season wears on, I find myself becoming a bit overwhelmed by how much of the stuff is getting harvested on a daily basis.  That's when I turn to asparagus soup. Mainly because by that point, I'm starting to get a bit weary of roasted asparagus and partly because it's, in my opinion, the best way to preserve the harvest. I make the soup and freeze it to enjoy in the middle of winter and it tastes just as fresh and perfect in December as it does when I make it! This recipe is great because it is easy to scale depending on how much asparagus you have. Make a big pot, enjoy a nice dinner, and freeze the rest in containers or bags (I have a vacuum sealer, so that's how I do it). 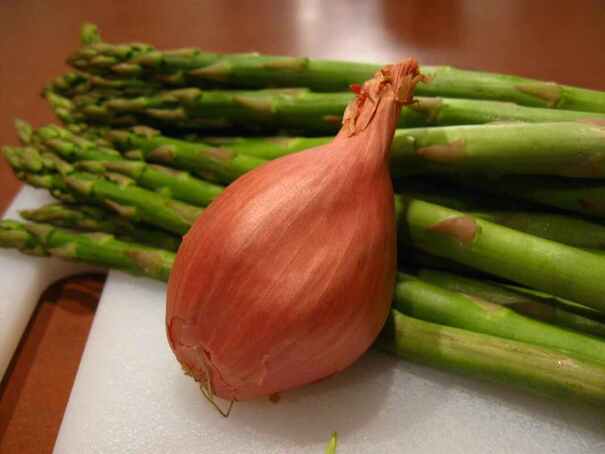 Cream of Asparagus Soup
Yield: 2 servings, double/triple, etc. as needed 1 TBS butter 1 small shallot, diced 1/4 cup celery ribs, diced 2 cups chopped asparagus spears, woody ends removed 2 cups chicken broth 1/4 cup cream (heavy or light, depending on your mood) salt & pepper to taste Sauté the shallot and celery in the butter over medium-high heat. Reduce heat as needed to prevent too much browning. When the shallot and celery are beginning to soften, add the asparagus. Sauté for another 3-4 minutes. Add the broth and bring the soup to a simmer. Cook until the vegetables are very tender, about ten minutes. Remove the soup from the heat and let cool slightly before pureeing in a food processor or blender. Return the soup to the pot and place back over the heat. Add the cream and salt and pepper. Heat, stirring, until it just reaches a simmer. Remove from the heat and serve. |
Archives
November 2023
Categories
All
|
 RSS Feed